Creating stunning Airbnb photos doesn't require a professional photographer or expensive equipment. With the right airbnb photo optimisation tips and approach, UK hosts can dramatically improve their listing's visual appeal using just a smartphone and some strategic planning. Quality photos are your listing's first impression, directly impacting booking rates and revenue potential.
Why Do Airbnb Photos Matter So Much for UK Hosts?
Photos drive 90% of booking decisions on Airbnb, making them your most critical revenue factor. UK guests scroll through dozens of listings, spending just 3-5 seconds evaluating each property visually before deciding whether to read further.
Research shows that listings with high-quality photos earn 40% more revenue than those with poor visuals. Your hero image alone determines whether potential guests click through to your full listing or scroll past to competitors. In competitive UK markets like London, Edinburgh, and Bath, professional-standard photos aren't just helpful—they're essential for standing out.
The booking psychology is straightforward: guests book spaces they can envision themselves enjoying. Blurry, dark, or cluttered photos create doubt, whilst bright, welcoming images build confidence and desire.
What Equipment Do You Actually Need for Great Airbnb Photos?
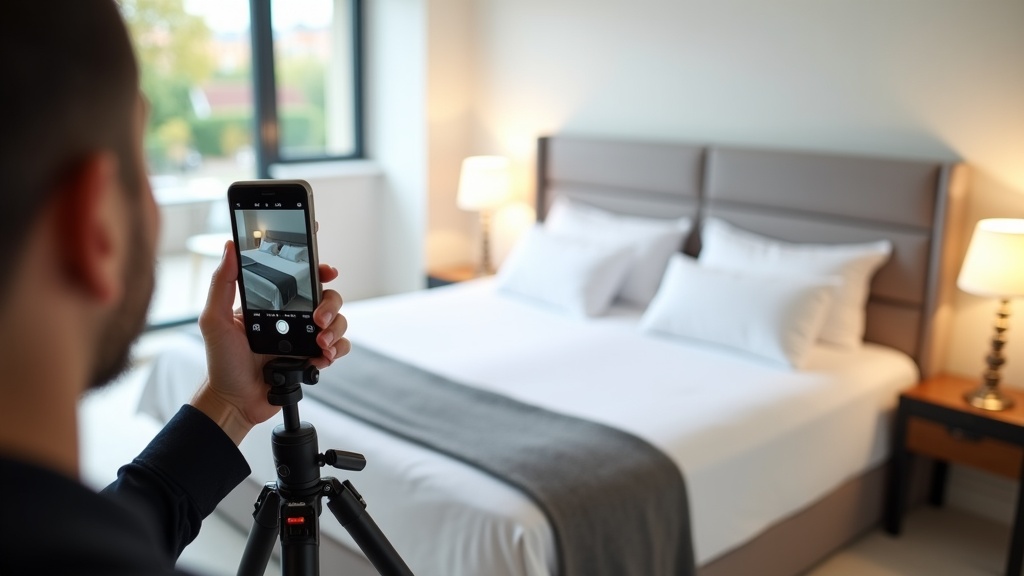
A modern smartphone (iPhone 12+, Samsung Galaxy S21+) with good camera capabilities, a basic tripod (£15-30), and natural lighting are sufficient for professional-quality results.
Forget expensive DSLR cameras and complex lighting setups. Today's smartphones capture excellent photos when used correctly. The key differences between amateur and professional-looking shots aren't equipment—they're technique, lighting, and composition.
Essential kit for DIY Airbnb photography:
- Smartphone tripod: Prevents blur, enables consistent framing (£15-30)
- Wide-angle lens attachment: Captures more of small spaces (£20-40, optional)
- Lens cleaning cloth: Ensures crystal-clear shots
- Bluetooth remote shutter: Reduces camera shake (£10-15)
That's genuinely all you need. Professional photographers succeed through skill, not gear—and you can learn those same techniques.
How to Style Your Space Before Taking Photos
Remove personal items, declutter surfaces, add strategic props like fresh flowers or books, and ensure all lights work. Think 'boutique hotel' rather than 'lived-in home'.
Staging transforms ordinary spaces into aspirational experiences. Start by removing everything personal—family photos, toiletries, random clutter. Guests want to imagine the space as theirs, not feel like they're intruding in someone's home.
Room-by-room staging checklist:
Living Areas
- Plump cushions and fold throws neatly
- Clear coffee tables except for one styled element (books, candle, plant)
- Open curtains/blinds fully
- Hide remote controls and cables
- Add a small plant or fresh flowers
Bedrooms
- Make beds with crisp, wrinkle-free linens
- Clear bedside tables except for a lamp and perhaps one book
- Ensure wardrobe doors are closed
- Add a throw at the foot of the bed for texture
Kitchen
- Clear all countertops except attractive appliances
- Open cupboard doors slightly to show storage space
- Place a bowl of fruit or fresh flowers as a focal point
- Ensure all surfaces are spotlessly clean
Professional tip: Take 'before' photos on your phone as you style each room. This helps you quickly reset spaces when switching between shots.
What Lighting Creates the Best Airbnb Photos?
Natural daylight between 10am-2pm produces the most flattering, bright photos. Open all curtains, turn on interior lights, and avoid shooting during golden hour when colour temperature becomes too warm.
Lighting makes or breaks property photos. The goal is bright, even illumination that makes spaces feel welcoming and spacious. Natural light is your best friend, but it must be managed correctly.
Optimal lighting strategy:
- Timing: Shoot mid-morning to early afternoon when natural light is bright but not harsh
- Window treatment: Open all curtains and blinds completely
- Interior lighting: Turn on every light in the room, including lamps
- Bathroom specifics: Use both overhead and vanity lighting to eliminate shadows
Many hosts make the mistake of shooting only with natural light, leaving interior areas looking dim by comparison. The human eye adjusts to mixed lighting, but cameras don't. By combining daylight with interior lighting, you create even, professional-looking illumination.
Avoid shooting at sunrise or sunset unless capturing exterior views. The warm, orange light that looks romantic to us often makes interiors appear dated or poorly lit in photos.
Which Angles and Compositions Work Best?
Shoot from chest height in corners to maximise space, use the rule of thirds for focal points, and ensure vertical lines (doorframes, walls) are straight to create professional-standard compositions.
Composition separates amateur snapshots from professional-quality images. Small adjustments in positioning and framing dramatically impact how spacious and appealing your property appears.
The Corner Technique
Position yourself in room corners to capture maximum space in a single frame. This technique makes small UK flats appear significantly larger whilst showcasing room flow and layout. Shoot from the corner diagonally opposite your main focal point (sofa, bed, island).
Height Matters
Hold your camera at chest height (roughly 1.2-1.4 metres). This mimics natural human perspective whilst avoiding the distortion that occurs when shooting too high or low. Never shoot from waist height—it makes ceilings appear lower and furniture look imposing.
Leading Lines
Use architectural elements like hallways, kitchen islands, or bed frames to guide the viewer's eye through the space. Strong leading lines create depth and draw attention to key features.
For small spaces common in UK city centres, slightly tilt your phone upward to include more ceiling. This simple trick makes rooms feel taller and more spacious.
What's the Perfect Photo Order for Maximum Bookings?
Lead with your most impressive space (usually living room or bedroom), follow with kitchen and bathroom, then amenities like parking or garden. End with neighbourhood shots showing local attractions.
Photo sequence psychology significantly impacts booking rates. Guests form impressions within the first 3-5 images, so front-load your strongest visual assets whilst maintaining logical flow.
Proven photo sequence for UK listings:
- Hero shot: Most impressive room (living space or master bedroom)
- Secondary hero: Kitchen or second-best room
- Full living area: Wide shot showing space and layout
- Master bedroom: If not used as hero
- Bathroom: Clean, bright, showing amenities
- Kitchen details: Close-ups of appliances and workspace
- Additional bedrooms: In order of attractiveness
- Special features: Garden, balcony, workspace, parking
- Building/exterior: Showing context and kerb appeal
- Neighbourhood: Local attractions within walking distance
Never bury your best features. If you have a stunning view, gorgeous bathroom, or coveted parking space, showcase it early. Remember that many guests don't scroll through all photos—make your first impressions count.
If you're struggling to determine your strongest visual assets, LetGrow's free listing analysis includes photo optimisation recommendations tailored to your specific property type and market.
How to Photograph Small Spaces to Look Larger
Use wide-angle shots, remove unnecessary furniture, create clear sightlines between rooms, and photograph from doorways to show connected spaces flowing together.
UK properties, particularly in cities like London and Manchester, are often compact. Smart photography techniques can make small spaces appear significantly larger and more appealing to potential guests.
Wide-Angle Techniques
Most modern smartphones have ultra-wide camera modes (0.5x zoom). Use these for room overviews, but be careful not to overuse them—excessive wide-angle shooting creates fisheye distortion that looks unprofessional. Aim for 70% standard shots, 30% wide-angle.
Furniture Positioning
Temporarily move furniture away from walls to create breathing room. Push dining chairs under tables, angle sofas to open up walking paths, and remove any unnecessary items that crowd the space.
Door and Window Strategy
Open internal doors to show connected spaces. A photo showing the living room flowing into the kitchen or hallway suggests more space than isolated room shots. Position yourself to capture these connections.
For studio flats and one-bedroom apartments, focus on creating distinct zones within the space. Use rugs, lighting, and furniture arrangement to define sleeping, living, and working areas clearly.
Which Room-Specific Tips Deliver the Best Results?
Each room type requires specific techniques: bedrooms need pristine linens and side lighting, kitchens benefit from open cupboards showing storage, bathrooms require powerful lighting to eliminate shadows.
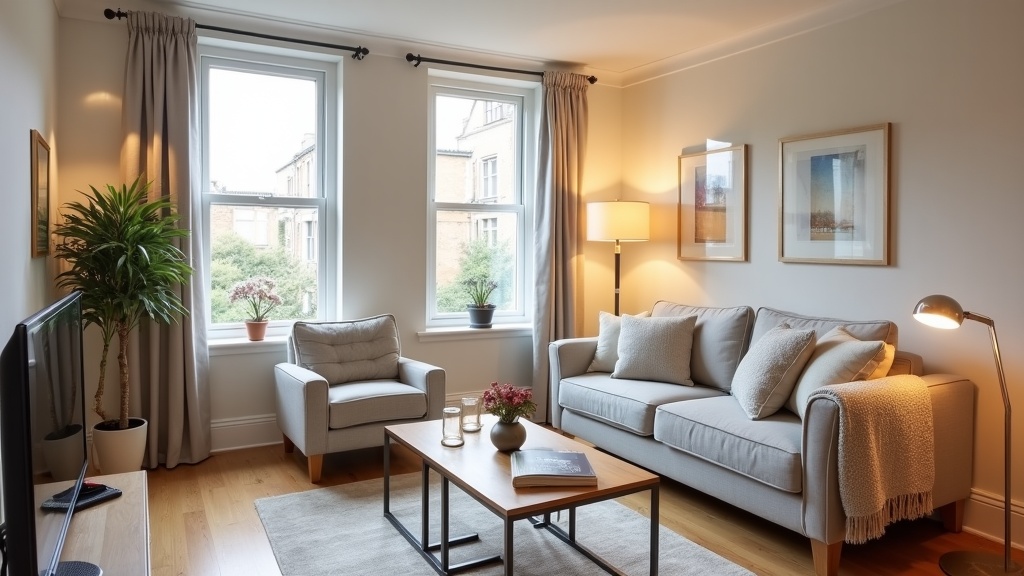
Living Rooms
The living room often serves as your hero shot, so perfect this space first. Remove remote controls, charger cables, and personal items. Arrange cushions asymmetrically for a naturally styled look. If you have a fireplace or interesting architectural features, use them as focal points.
Turn on lamps and overhead lighting, even during daylight hours. This creates warm, even illumination that makes the space feel welcoming rather than stark.
Bedrooms
Invest time in making beds perfectly. Pull sheets tight, fluff pillows symmetrically, and add a throw blanket for texture. Shoot from the foot of the bed at a slight angle to show the room's full width.
Include a shot from the bed's perspective showing what guests wake up to—whether that's a window view, artwork, or simply a sense of space and light.
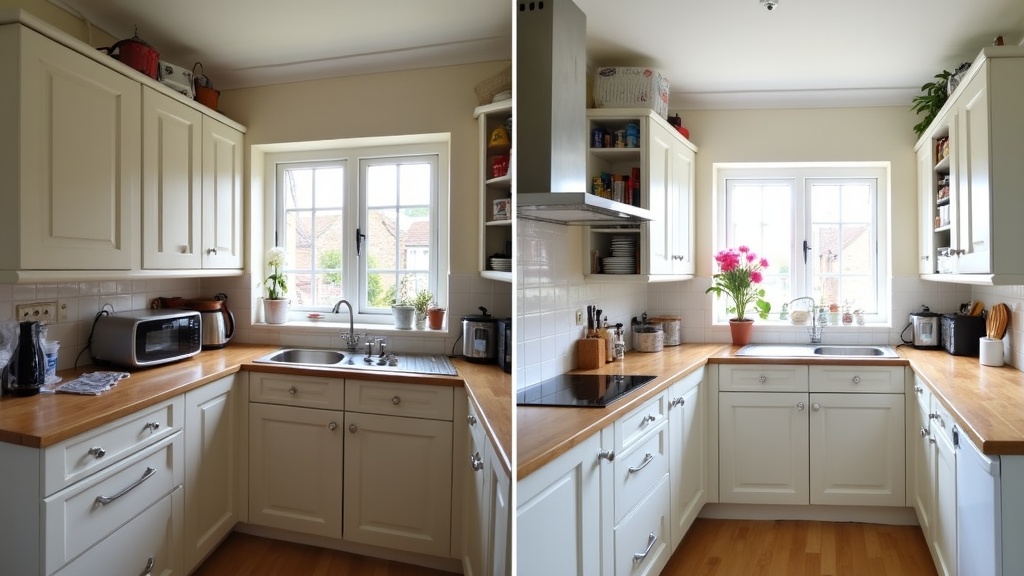
Kitchens
Kitchens sell functionality and lifestyle. Clear countertops completely, then add back just one styled element—a bowl of fresh fruit, coffee setup, or small plant. Open a few cupboard doors slightly to demonstrate ample storage.
Take both wide shots showing the full kitchen and detail shots highlighting premium appliances or features like dishwashers, coffee machines, or island seating.
Bathrooms
Bathrooms require the strongest lighting to look appealing. Turn on overhead lights, vanity lights, and any additional fixtures. Remove all personal toiletries and add fresh towels in neutral colours.
For small UK bathrooms, shoot from the doorway to maximize the sense of space. Include the toilet in overview shots—guests want to see the full layout for practical planning.
Creating compelling photos across all these room types takes practice and attention to detail. For hosts wanting professional guidance on their specific property, LetGrow provides detailed photo optimisation recommendations as part of its comprehensive listing analysis.
How to Edit Photos for Professional Results
Use smartphone apps like VSCO or Lightroom Mobile to brighten shadows, straighten lines, and enhance colours. Keep edits subtle—over-processed photos look fake and disappoint guests upon arrival.
Editing transforms good photos into great ones, but restraint is key. Your goal is enhancing reality, not creating fantasy. Guests will compare your photos to the actual space, so dramatic filters or unrealistic colours will damage trust and reviews.
Essential editing adjustments:
- Brightness: Lift shadows slightly to reveal detail in darker areas
- Contrast: Add subtle contrast to make images 'pop' without looking harsh
- Straightening: Ensure vertical lines are perfectly straight—crooked walls look unprofessional
- Colour temperature: Adjust to ensure whites look white, not yellow or blue
- Saturation: Enhance colours very slightly—over-saturated images look artificial
Free Editing Apps
VSCO: Professional-quality filters and adjustment tools. Use the 'HB1' or 'A6' presets as starting points, then fine-tune.
Lightroom Mobile: Adobe's mobile version offers precise control over exposure, highlights, and shadows. The free version includes all essential tools.
Snapseed (Google): Excellent for perspective correction and selective adjustments.
Establish a consistent editing style across all photos. This creates visual cohesion that makes your listing appear more professional and thoughtfully curated.
What Common Photo Mistakes Should UK Hosts Avoid?
Avoid shooting in poor light, leaving personal items visible, using excessive filters, photographing unmade beds, or including unflattering exterior shots. These mistakes immediately signal amateur presentation to potential guests.
Learning from common mistakes helps hosts avoid obvious pitfalls that damage booking potential. Here are the errors that immediately mark listings as unprofessional:
Lighting Disasters
- Shooting during late afternoon when shadows are harsh
- Leaving curtains closed or partially closed
- Not turning on interior lights during daytime shoots
- Creating mixed colour temperatures (warm and cool light in the same shot)
Staging Failures
- Leaving personal photos, toiletries, or clothes visible
- Unmade beds or wrinkled linens
- Cluttered surfaces and overflowing bins
- Dirty dishes in sinks or on countertops
Technical Issues
- Blurry photos from camera shake
- Crooked horizons and tilted vertical lines
- Over-editing that makes spaces look unrealistic
- Poor framing that cuts off important elements
Strategic Mistakes
- Using weak images as the hero shot
- Failing to show key amenities like parking or workspace
- Including too many similar angles of the same room
- Neglecting to photograph neighbourhood context
The goal is creating realistic but aspirational images. Think 'this is what your space could look like on its best day' rather than 'this is a completely different property'.
How to Measure and Improve Your Photo Performance
Monitor your listing's view-to-booking conversion rate, guest feedback about photos, and compare performance against similar local properties. A/B test different hero images to identify your strongest visual assets.
Great photos should translate into measurable results: more views, higher booking rates, and better guest reviews. If you're not seeing improvement after updating photos, dig deeper into the data.
Key metrics to track:
- Search ranking: Are you appearing higher in search results?
- Click-through rate: What percentage of search views convert to profile visits?
- Booking conversion: How many profile visitors actually book?
- Review mentions: Do guests comment on your space being 'exactly as pictured'?
Professional property photographers report that optimised photos typically increase booking rates by 20-40% within 30 days. If you're not seeing similar improvements, consider whether your photos truly represent your space's best features.
Sometimes the issue isn't photo quality but photo strategy. You might have beautiful images that don't address guest priorities—like showing artistic shots instead of practical amenities, or highlighting design elements guests don't value.
Not sure how your photos compare to successful local listings? Get your free Airbnb performance score to see how your visual presentation stacks up against competitors in your area.
Remember that photo optimisation works hand-in-hand with other listing elements. Even stunning photos won't overcome poor pricing strategy or weak descriptions. For comprehensive guidance on optimising every aspect of your listing, check out our complete UK Airbnb listing optimisation guide.
Similarly, your visual presentation should support your written content. If you're highlighting workspace amenities in photos, ensure your Airbnb title mentions this feature to attract the right guest segment.
Frequently Asked Questions
How many photos should I include in my Airbnb listing?
Include 15-25 high-quality photos covering all rooms, amenities, and key features. Quality matters more than quantity—better to have 15 excellent photos than 30 mediocre ones.
Should I hire a professional photographer for my Airbnb?
Professional photography isn't essential if you follow proper techniques with a good smartphone. However, for high-end properties or competitive markets, professional shots can provide a significant advantage.
How often should I update my Airbnb photos?
Update photos when you make significant changes to the space, seasonally for outdoor areas, or if your booking performance declines. Fresh photos can reinvigorate interest in established listings.
Can I use filters on my Airbnb photos?
Light editing is acceptable, but avoid heavy filters. Your photos should accurately represent the space—misleading images lead to disappointed guests and negative reviews.
What's the most important photo in my listing?
The hero (first) photo is crucial as it appears in search results. Choose your most impressive, well-lit room that best represents your property's unique appeal.
Should I include photos of the neighbourhood?
Yes, include 2-3 photos showing nearby attractions, transport links, or street context. These help guests understand location and build confidence in their choice.
Quality photos are fundamental to Airbnb success, but they're just one piece of the optimisation puzzle. Combined with strategic pricing, compelling descriptions, and proper amenity selection, professional-standard photography can transform your listing's performance. Ready to see how your complete listing measures up? Get your free score at LetGrow.